This is going to be a picture-less post, but I just have to rave about the cleaning solution I used the other day.
(No, I'm NOT trying to sell you anything, I just have to pass on this cheap and easy thing that's going to make my life slightly easier.)
I'd been reading on Pinterest—an amazing time suck and fantastic inspiration, all wrapped up in one—about a cleaner for showers/tubs using just an equal portion of Dawn dish washing soap and hot vinegar. I'd seen enough people rave about it that I figured it would be worth a try, and I wouldn't be out anything since I already had that stuff on hand.
IT'S AMAZING. My shower hasn't been that clean for a long time, and I didn't have to expend anywhere near as much energy as I usually do.
I put 1 cup of vinegar in a spray bottle and microwaved it until it was hot (one minute in my microwave--I was kind of worried about melting the bottle but it was fine). Then I added one cup of blue Dawn dish washing soap and shook it. Then I sprayed it all over my shower and let it sit for a while. The smell of the vinegar kind of made me cough a bit, but it wasn't any worse than Scrubbing Bubbles or similar things.
After letting it sit, I scrubbed it with a scrub brush, but not as much as I normally do with other things like Soft Scrub. I let it sit for a little longer, then hosed it down with the shower head (YAY for removable shower heads!) and gave it one more pass with a scrub brush.
I'm so impressed with how shiny everything is!
I also used it on the sink faucet and it looks like new.
I think I'll be doing this every few weeks to keep things sparkly and clean. Cleaning the shower won't be an hour-plus project any more. Yay!
RECIPE:
Heat one part vinegar until just under boiling.
Pour into a spray bottle.
Add one part Dawn dish soap and shake.
Spray on surfaces to be cleaned and let them sit for a while (an hour is good).
Scrub, then rinse. Enjoy the shiny!
I used one cup of each and it was enough to do both the tub in the kids' bathroom and the shower stall in the master bath, plus the sinks/faucets in both bathrooms. Next time I might just do half a cup of each.
Tuesday, May 08, 2012
Tuesday, April 24, 2012
Look out, it's a partial catch-up post...
How the heck have six months gone by without a blog post? Shesh!
While it seems like it's just been day-to-day life stuff going on, I have managed to get some creative projects finished. I've been doing a fair bit of quilting for others, but for this post I'm going to focus on things I've done for myself.
Starting with the most recent craft: weaving! My Mom gave me her Northfield Tia rigid heddle loom, and I've really been enjoying it. So far I've woven 11 washcloths (pathetically small, but it was great practice) using some hemp/cotton yarn that's been languishing in my stash. I also made a hounds tooth scarf that I'm ridiculously pleased with.


Earlier this month I pulled out my spinning wheel for my monthly hour or so of spinning. (I haven't been focusing on the wheel much, unfortunately!) This is some roving that I bought at least three years ago. I've got to spin up more of what I've got before Fiber Christmas in July, when I know at least a few new rovings will want to come home with me.

I've been fairly good about finishing knitting projects, so here's a roundup of the last six or so months, in no particular order.
I tested a neat crocheted headband pattern, and ended up with this lovely item:
 The pattern is available here on Ravelry (it's not mine).
Also on the handspun front, I *finally* finished my Bono Kimono, using my hanspun and hand-dyed yarn:

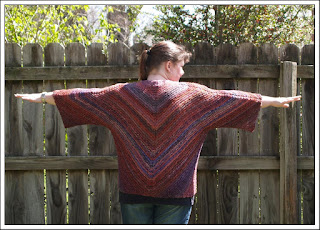
I'm thinking about putting a zipper in it. We'll see. This is a project that sat for about a year and a half while I decided if I wanted to rip out about a third of it and re-do the sleeve/body proportions. I'm so glad I did! Instead of the sleeves and side triangles being the same size, I made the side triangles each 2" wider, which took 4" total from each sleeve.
The next finished item is this Whippoorwill Shawl (Ravelry link), using yarn that I dyed while we were in Idaho over the summer. The grey is KnitPicks non-superwash Bare fingering-weight yarn, dyed with Jacquard black (which broke just beautifully!). The orange is KnitPicks Gloss fingering-weight yarn in pumpkin, overdyed with black.

Here's another test knit, Blue Hour Gloves:
 I dyed the pink and blue yarns. All of it is Palette from KnitPicks. I really enjoyed making these, which surprised me--last time I did partial-fingered gloves I thought they were incredibly fiddly. Of course the fingers *are* fiddly, but I'm so in love with these it's not even funny. I see more hand-knit gloves in my future.
Here's another quick test-knit that I did, Scally's Cap. Are you noticing a trend with test knitting? I love it because there's a deadline (which I've established that I desperately need or I get craft ADD) and I get the pattern for free.

These beautiful cuffs are from a pattern by Sivia Harding. She came for a workshop with the knitting guild, and I had such a good time with her! She stayed with me and I'm happy to report that she's just as amazing in person as she seems on the internet. The cuffs below are her Aquitaine Cuffs, and I swear I wore them every day until the weather got warm enough that I couldn't stand to wear them any more. The yarn is 80% alpaca, 20% silk that I won at Fiber Christmas as least four years ago.


Here's (yet another) test knit:
 Those are Scullers Socks, and as you can see the gusset decreases are on the bottom of the foot. These were fun to make!
Still another test knit, here's my Contrast and Complement shawl:
 It's a big shawl, and I used acrylic yarn so that I can machine wash and dry it.
I didn't manage to get a finished project picture of this, but it was pretty spectacular and I'm going to have to make one for myself. The pattern is the Garter Stripe Squares bag on Ravelry.

I've got a LOT of pictures of this next project because I'm so darn pleased with it.
I won the roving from Woolgatherings during the 2010 Tour de Fleece on Ravelry.

I separated out the different colors and spun it up as a progression, then chain-plied the singles.
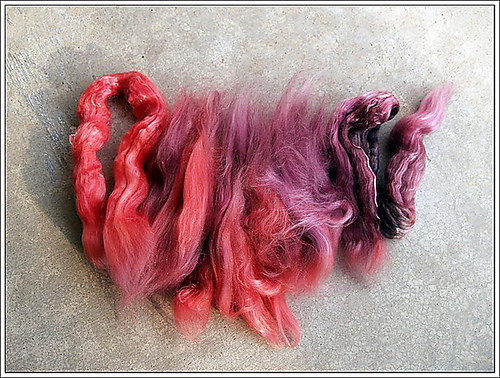

My lovely friend Calista bought me the pattern, Lazy Katy, and away I went! :-)
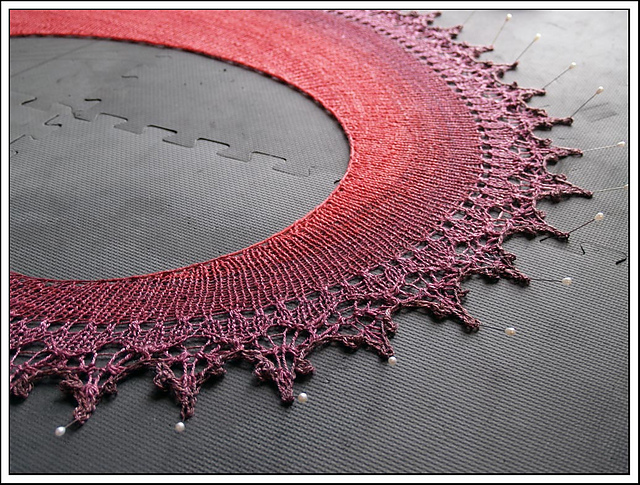
The color is really hard to capture, but that last picture is the most accurate. I re-designed the lace border since I didn't have quite enough of my handspun, and ended up with about 6 yards left over.
Both of the pictures blow were taken as it's blocking.

 And to stop for the moment, here's a sock (I made a pair, just didn't photograph both) that I test knit. It's a mosaic pattern, which means you're never working with more than one color of yarn per round. It was quite fun!

One last picture! This is from the Gilcrease Museum gardens. When my parents were here in April, we went to the Gilcrease and the Philbrook, and of course since it was the first week in April all of the azaleas were absolutely spectacular. Don't you think?

While it seems like it's just been day-to-day life stuff going on, I have managed to get some creative projects finished. I've been doing a fair bit of quilting for others, but for this post I'm going to focus on things I've done for myself.
Starting with the most recent craft: weaving! My Mom gave me her Northfield Tia rigid heddle loom, and I've really been enjoying it. So far I've woven 11 washcloths (pathetically small, but it was great practice) using some hemp/cotton yarn that's been languishing in my stash. I also made a hounds tooth scarf that I'm ridiculously pleased with.


Earlier this month I pulled out my spinning wheel for my monthly hour or so of spinning. (I haven't been focusing on the wheel much, unfortunately!) This is some roving that I bought at least three years ago. I've got to spin up more of what I've got before Fiber Christmas in July, when I know at least a few new rovings will want to come home with me.

I've been fairly good about finishing knitting projects, so here's a roundup of the last six or so months, in no particular order.
I tested a neat crocheted headband pattern, and ended up with this lovely item:

Also on the handspun front, I *finally* finished my Bono Kimono, using my hanspun and hand-dyed yarn:


I'm thinking about putting a zipper in it. We'll see. This is a project that sat for about a year and a half while I decided if I wanted to rip out about a third of it and re-do the sleeve/body proportions. I'm so glad I did! Instead of the sleeves and side triangles being the same size, I made the side triangles each 2" wider, which took 4" total from each sleeve.
The next finished item is this Whippoorwill Shawl (Ravelry link), using yarn that I dyed while we were in Idaho over the summer. The grey is KnitPicks non-superwash Bare fingering-weight yarn, dyed with Jacquard black (which broke just beautifully!). The orange is KnitPicks Gloss fingering-weight yarn in pumpkin, overdyed with black.

Here's another test knit, Blue Hour Gloves:

Here's another quick test-knit that I did, Scally's Cap. Are you noticing a trend with test knitting? I love it because there's a deadline (which I've established that I desperately need or I get craft ADD) and I get the pattern for free.

These beautiful cuffs are from a pattern by Sivia Harding. She came for a workshop with the knitting guild, and I had such a good time with her! She stayed with me and I'm happy to report that she's just as amazing in person as she seems on the internet. The cuffs below are her Aquitaine Cuffs, and I swear I wore them every day until the weather got warm enough that I couldn't stand to wear them any more. The yarn is 80% alpaca, 20% silk that I won at Fiber Christmas as least four years ago.


Here's (yet another) test knit:

Still another test knit, here's my Contrast and Complement shawl:

I didn't manage to get a finished project picture of this, but it was pretty spectacular and I'm going to have to make one for myself. The pattern is the Garter Stripe Squares bag on Ravelry.

I've got a LOT of pictures of this next project because I'm so darn pleased with it.
I won the roving from Woolgatherings during the 2010 Tour de Fleece on Ravelry.
I separated out the different colors and spun it up as a progression, then chain-plied the singles.
The color is really hard to capture, but that last picture is the most accurate. I re-designed the lace border since I didn't have quite enough of my handspun, and ended up with about 6 yards left over.
Both of the pictures blow were taken as it's blocking.

One last picture! This is from the Gilcrease Museum gardens. When my parents were here in April, we went to the Gilcrease and the Philbrook, and of course since it was the first week in April all of the azaleas were absolutely spectacular. Don't you think?

Subscribe to:
Posts (Atom)